Tuesday, April 30, 2013

How to do: Gradient Nail Art

Gradient Nail looks go something like this:


or this:


Its a super fun trend that will get you double takes and lots of compliments!  The bummer is that its a bit messy, however, its not too hard to pull off - I would say a medium skill level is required (just try it already!)

Here's the deets below:

What you need
- Base Coat
- Polish Remover
- Makeup Sponges

- Shades of Polish
- Orange Stick
- Cuticle Oil (use Argon Oil or just lotion in a pinch)
- Anti-chip top coat

Step 1:  Choose your colors!  Will you go with a simple two-tone

OR are you going for the tri-color look?

Take the guess work out of it and grab one of these kits from China Glaze (available at Sally Beauty Supply for under $20)

PLUS, if you get frustrated with this look - then you already have the perfect shades to do an 'easier' Ombre mani:

Step 2: Prep nails with a great base coat, I like Jessica Restore Nail Base

(available on amazon.com for $8)
then paint the nail the anchor color, usually white or the lightest color.  You don't have to have an anchor color, but I recommend it for the first time around.  Especially with three colors, then you only have to sponge on 2 colors!


Step 3: Once base coat is semi-dry (give it at least 20 minutes) grab an old magazine or some tin foil as your 'station' because you will be 'dumping' out some polish, unless you end up wanting to 'paint' on the shades to a sponge for each nail - either way works.  Optional: prep the cuticle with a bit of cuticle oil and let absorb, wipe off excess.  This is a good step because the more hydrated your cuticle is, the better the polish will come off with the remover when you have to clean around the nail at the end


Step 4:  Dump out the colors and 'blend' with a toothpick

OR, just paint the colors onto the end of the sponge for each nail application


Step 5: Dab onto nail, don't 'swipe' you'll blend the colors too much.  If you can quick clean off the excess with a Q tip (and then get the rest later when dry) the better!

Check it out:


If you're just doing 2 colors, you can always just paint the tip of the nail the 2nd color, then use the sponge to just smooth the transition

Step 6: Clean up the nail area.  Wait until nails are nearly dry to do it so you don't smudge!


Step 7:  Aplly a super glossy top coat!  Everything looks better with an ultra glossy top coat!!  One to try, how about the 'gel' effect that Nail Inc gives you with their 'gel' top coat - it makes it look like an authentic gel mani!

($10 at Sephora)

Some of my fav looks in the gradient are below

I love this 'starry night' look!  Paint nails a shimmery champagne color then sponge on pale blue and glitter navy blue


The "super pastel" gradient, it looks like sweet princess candy (or something like that!)


The "orange dream" gradient.  This is a great way to wear orange, it makes it more fun than just bold bright nails


The "super metallic" gradient in a toxic green is SURE to get you all kinds of compliments!


"Glitter Gradient" in these deep shades looks utterly cosmic!


The "french mani' gradient - looks just like one, but has a softer transition:


And finally, the "change up" gradient - where you reverse the shades on various nails, its even more funky than the original!


Are YOU going to give gradient nails a try?!

Thursday, April 25, 2013

Tarte's New 100% Waterproof Collection Inspired by Syncronized Swimmers!

If you're a Gleek like me (a fan of the show Glee) then you obvi saw the episode with the synchronized swimmers, the Aqualillies?!?!?!


Anywho - Tarte Cosmetics was so inspired by them, that they created a whole collection of 100% waterproof cosmetics for the retro swim-cap wearers in all of us!!!


Check out the whole collection at Ulta, coming next week!

The collection is ADORABLE (how will I live without that cosmetic bag?)

The "Lights, Camera, Splashes" Mascara is a staple item in the Tarte line, but was a perfect throw in with this collection for sure!  It's def one of my top waterproof mascara picks! (always $19)

The Amazonian Clay finishing powder is also a key item (I just blogged about it this week) and it was also added in here with limited edition packaging (still $29)

Clearly, the key item here is the palette, which is so eye catching!

I honed right on on the bronzer and blush, which have major staying power because of the amazonian clay!

and the shadows can create SO many looks:


Hold on, let me put on my shower cap (perfect for protecting a great blow out!)

heheheheheee!!!!

There is only one super long wearing lipstick shade in the collection, and that's because it is a universally flattering coral-red that makes your skin look great and teeth look white and it STAYS ALL DAY!


Next we look at the glosses, infused with Maracuja Oil

Truthfully, glosses aren't my thing.  They are very pretty, and hydrating.  But they don't hold up next to that amazing lipstick!

Next, we take a look at the ultra-waterproof eyeliners, AND the awesome applicator brush that comes with it!  As if the turquoise color of the brush wasn't enough, its actually totally functional, because the angle allows you more precision during application!

There are two liner shades, the deep inky black that is perfect for every summer day, swimming or not.  Then there is the unique blue/green shade that is synonymous with the packaging of the collection itself:


Check out the two distinct looks below, I am loving them!


If you're only able to grab one this from the collection - grab the waterproof eyeliner!  You'll get tons of use out of it and you'll also nab a great applicator brush for only $22


If you can treat yourself to one more item, make it the lipstick - I LOVE it!


Check out some of the Aqualillies modelling the collection and get inspired to re-create their looks!!  Happy Swimming!!!!!


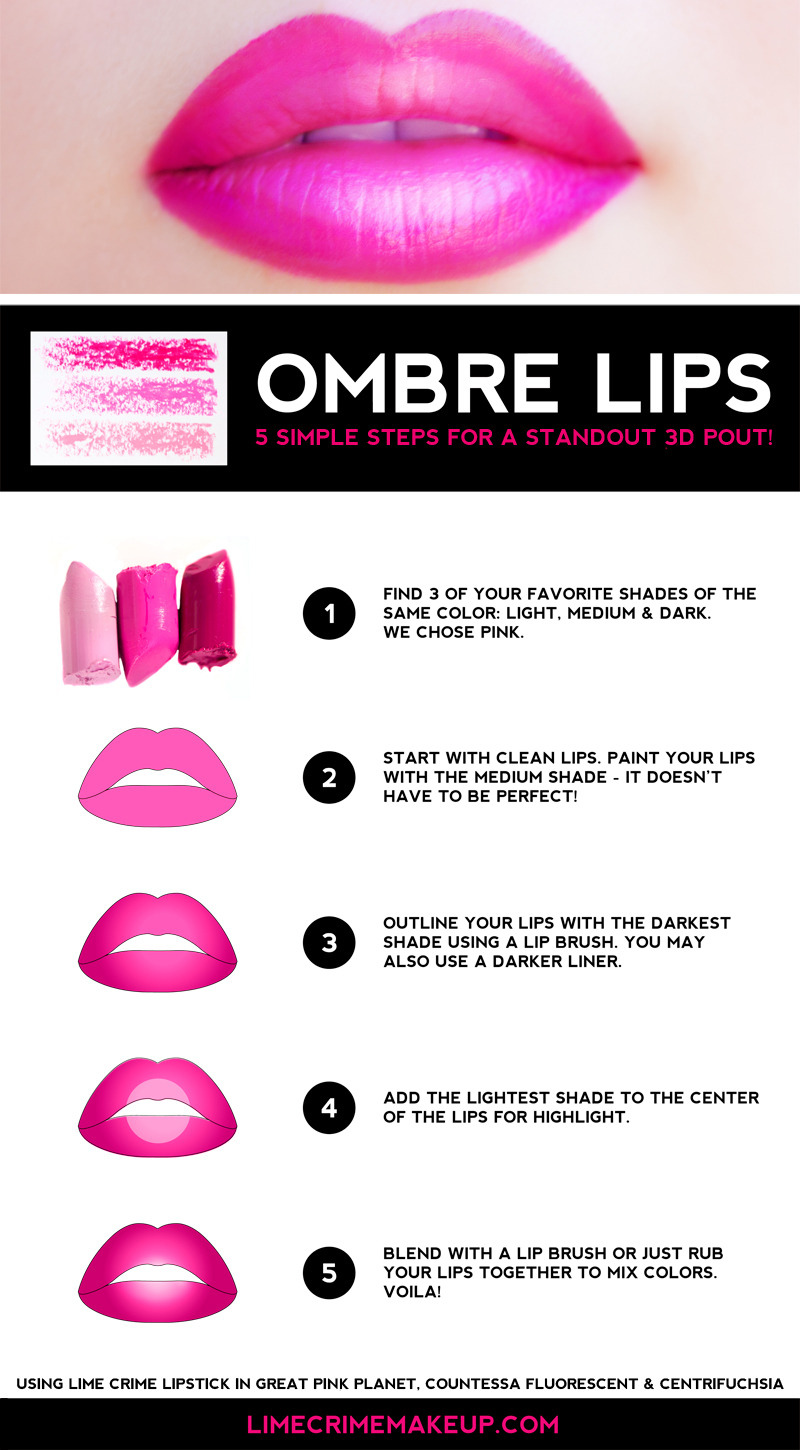
Neon Ombre Lips - an Inspiration!

I'm working on perfecting some of these looks!  Check them out!


I'm loving this tutorial someone posted on tumbler:

Two-tone lips, a great $12 product to try!

The two tone lip is taking off, not just fashion models in crazy outfits are doing it, no, women all over are giving it a try - and BITE cosmetics is making it easier than ever with their new product:

Bite Beauty - Lip Layers
"Lip Layers"

Its a dual-ended lipstick with complimentary shades so you can pull of this trend flawlessly (now the only part you'll have to master is not mashing your lips together!  LOL!)

BITE knows lips, because that is what they do!


This product is BRAND new and only at Sephora
http://www.sephora.com/lip-layers-P378654
and guess what?  Its only $12!!!

2 lip colors for $12?!  What are you waiting for?

What's even better is that BITE's products are made from food-grade ingredients, not synthetics or petroleum based ingredients - aka: you can take a 'bite' out of it and it safe enough to eat!  (uh, don't do that, you'll waste a great lipstick!)

Create that ombre lip look with their bold shades in several ways:

Dark on outside, light on inside:


OR reverse that:


OR, this one is super popular, go for one shade on top and the other on the bottom


Skip the bold all together, and go for a nude ombre lip with BITE's other dual-ended product in the nude shades
Bite Beauty - Lip Layers
Apply the dark on the inner part of the lips:


OR: Dark on the outer corners


This is a great product to get you started on this huge trend, because its formulated to be applied right from the tube and its a really fair price for a healthy lip product!